Configuring Duo SSO on a Synology NAS
SSO (Single Sign-On) is a useful tool for rapidly authorizing user access and maintaining a centralized credential store to use a single password between applications. Synology NAS devices support a variety of different ways fetch users from third-party directories, such as Active Directory and LDAP. In addition to those methods, Synology also supports four different types of SSO Client options which include OpenID Connect, SAML, CAS, and Synology SSO. There is a difference between the SSO Client and SSO Server options in Synology, the SSO Client enables us to utilize an existing SSO provider while the SSO Server uses it’s internal users for authentication by third-party services. Please note that this guide only covers the SSO Client and also has any relevant LDAP information.
My Synology RackStation was initially setup with LDAP (Active Directory) to automatically add users and grant access based on their role to specific features on the NAS. My understanding is having LDAP is necessary for Duo to authenticate SSO users as the Duo Authentication Proxy typically references Active Directory or OpenLDAP. Either way, I intended to have both LDAP and SSO enabled to take advantage of the account provisioning with LDAP and two-factor authentication with Duo.
Duo Configuration
You will first want to sign-in to the Duo Admin Center and select Applications > Protect an Application. From this screen, you will want to search for “Generic OIDC Relying Party” and select Protect. On the next screen, you will be presented with Metadata which you will need momentarily to configure the Synology NAS. Scroll down on the page until you see an option labeled Sign-In Redirect URLs. In this field, enter:
https://<PUBLIC_ADDRESS_TO_NAS>.com:5001/#/signinReplace <PUBLIC_ADDRESS_TO_NAS> with the public URL that can access your NAS. Having a valid SSL is required for this to work.
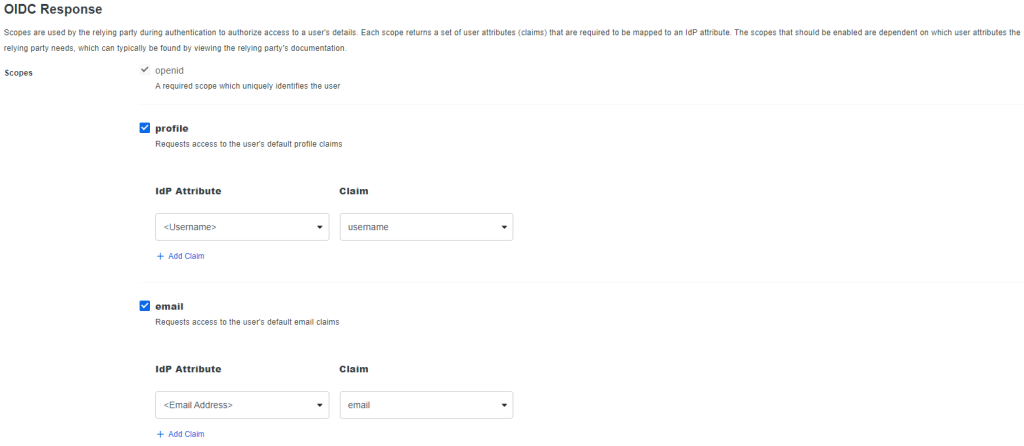
Continue scrolling down on the page until you see a section for OIDC Response. Under scopes, fill out the following:

Scroll back up to the Metadata section of the page to configure the Synology NAS.
Synology Configuration
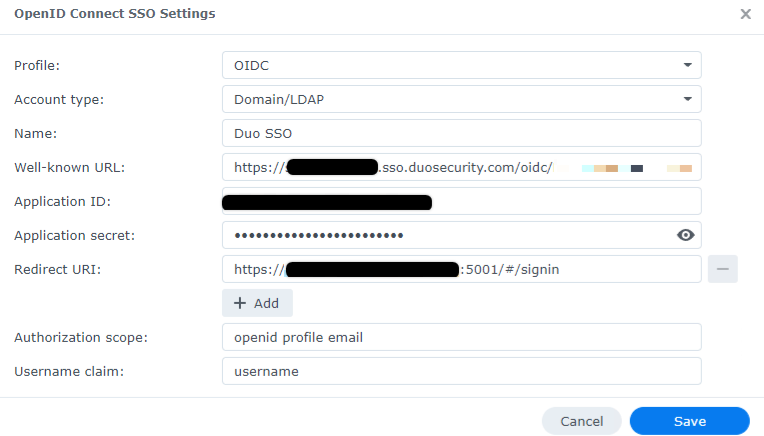
Sign-in to the Synology NAS and open up the Control Panel. Next, go to Domain/LDAP and then in the top menu select SSO Client. On this page, select the checkmark next to Enable OpenID Connect SSO Service then select the OpenID Connect SSO Settings button. You will then want to select the following.
Profile: OIDC
Account Type: Domain/LDAP
Name: Duo
Well-known URL: <Discovery URL from Duo>
Application ID: <Client ID from Duo>
Application Secret: <Client Secret from Duo>
Redirect URI: https://<PUBLIC_ADDRESS_TO_NAS>.com:5001/#/signin
Authorization scope: openid profile email
Username claim: username

Once done, select save. If you wish to enable SSO as the default option, select that checkmark on the SSO Client tab and select save. Synology should now be working with OIDC Authentication for LDAP accounts with Duo.
Please share this article if you like it!


